Last time I shared some tips on how to use libraries well. I now want to delve deeper into one of those: Know What Libraries You Use.
Last week I set out to create such a list of embedded components for our product. This is a requirement for our Security Development Lifecycle (SDL).
However, it’s not a fun task. As a developer, I want to write code, not update documents! So I turned to my friends Gradle and Groovy, with a little help from Jenkins and Confluence.
Our build defines a list of names of configurations for embedded components, copyBundleConfigurations, for copying those to the distribution directory. From there, I get to the external dependencies using Groovy’s collection methods:
However, Gradle dependencies don’t contain all the required information.
For instance, we need the license under which the library is distributed, so that we can ask the Legal department permission for using it.
So I added a simple XML file to hold the additional info. Combining that information with the dependencies that Gradle maintains is easy using Groovy’s XML support:
I then created a Gradle task to write the information to an HTML file. Our Jenkins build executes this task, so that we always have an up-to-date list. I used Confluence’s html-include macro to include the HTML file in our Wiki.
Now our Wiki is always up-to-date.
Automatically Looking Up Missing Information
The next problem was to populate the XML file with additional information.
Had we had this file from the start, adding that information manually would not have been a big deal. In our case, we already had over a hundred dependencies, so automation was in order.
First I identified the components that miss the required information:
Next, I wanted to automatically look up the missing information and add it to the XML file (using Groovy’s MarkupBuilder). In case the required information can’t be found, the build should fail:
project.afterEvaluate {
  def missingComponents = missingExternalDependencies()
  if (!missingComponents.isEmpty()) {
    def manualComponents = []
    def writer = new StringWriter()
    def xml = new MarkupBuilder(writer)
    xml.expandEmptyElements = true
    println 'Looking up information on new dependencies:'
    xml.components {
      externalDependencyInfos().each { existingComponent ->
        component {
          id(existingComponent.id)
          friendlyName(existingComponent.friendlyName)
          latestVersion(existingComponent.latestVersion)
          license(existingComponent.license)
          licenseUrl(existingComponent.licenseUrl)
          approved(existingComponent.approved)
          comment(existingComponent.comment)
        }
      }
      missingComponents.each { missingComponent ->
        def lookedUpComponent = collectInfo(missingComponent)
        component {
          id(missingComponent)
          friendlyName(lookedUpComponent.friendlyName)
          latestVersion(lookedUpComponent.latestVersion)
          license(lookedUpComponent.license)
          licenseUrl(lookedUpComponent.licenseUrl)
          approved('?')
          comment(lookedUpComponent.comment)
        }
        if (!lookedUpComponent.friendlyName ||
            !lookedUpComponent.latestVersion ||
            !lookedUpComponent.license) {
          manualComponents.add lookedUpComponent.id
          println '    => Please enter information manually'
        }
      }
    }
    writer.close()
    def embeddedComponentsFile =
        project.file(embeddedComponentsInfo)
    embeddedComponentsFile.text = writer.toString()
    if (!manualComponents.isEmpty()) {
      throw new GradleException('Missing library information')
    }
  }
}
Anyone who adds a dependency in the future is now forced to add the required information.
So all that is left to implement is the collectInfo() method.
All of this took me a couple of days to build, but I feel that the investment is well worth it, since I no longer have to worry about the list of used libraries being out of date.
How do you maintain a list of used libraries? Please let me know in the comments.
There are many good reasons to use code written by others in your application.
This post describes some best practices to optimize your re-use experience.
Library Use Gone Bad
I recently discovered that a library we use for OpenID didn’t handle every situation properly. When I checked for an update, I found that the library is no longer maintained. So I found an alternative and tried to swap that new library in, only to discover that classes from the old library were used all over the place.
This little story shows that a lot can go wrong with using third-party libraries.
The remainder of this post will look at how to use libraries properly. I’m going to focus on open source projects, but most of the same considerations apply for commercial libraries.
1. Use Only Actively Maintained Libraries
Look at things like the date of the latest release, the number of developers contributing, and the sponsoring organizations.
2. Use Only Libraries With an Appropriate License
What’s appropriate for you obviously depends on your context. For instance, if you’re building and distributing a commercial, closed source application, you shouldn’t use any library that only comes with the GPL.
3. Limit the Amount of Code That Touches the Library
Use the Facade design pattern to wrap the library in your own interface. This has several advantages:
It allows you to easily replace the library with another, should the need arise
It documents what parts of the library you are actually using
It allows you to add functionality that the library should have provided but doesn’t, and do so in a logical place
4. Keep the Library Up-to-date
Many developers live by the rule “if it ain’t broke, don’t fix it”. However, you may not notice some of the things that are broken. For instance, many libraries contain security vulnerabilities that are fixed in later versions. You won’t notice these problems until a hacker breaches your application.
5. Write Regression Tests For the Library
If you’re regularly going to update the library, as I suggest, then you’d better know whether they broke anything in a new release. So you need to write some tests that prove the functionality that you want to use from the library.
As a bonus, these tests double as documentation on how to use the library.
6. Know What Libraries You Use
You should always be able to tell what libraries you are using at
any given moment, as well as their versions and licenses. You just never know when someone from the security team is going to call you about a critical vulnerability in a specific version of a library, or when the legal department suddenly decides to forbid the use of a certain license.
7. Take Ownership of the Library
Your application provides functionality to its users. They don’t care whether you build that functionality yourself, or whether you use a library. Not should they. When there is a problem anywhere in your code, you need to be able to fix it.
So think about how you are going to do that for the libraries you plan on using. Are the developing organizations responsive to bug reports? Do you have access to the source? Are the developing organizations willing to apply your patches? Does the license permit modifying the code for private use?
So what have your experiences been with using third-party libraries? Please let me know in the comments.
Refactorings are standard alterations of the code that change its internal structure without changing its external behavior.
Now, if the Green and Refactor phases are each others opposite, then you might think that there are “opposite refactorings” as well. You would be right.
Robert Martin‘s transformations are standard alterations of the code that change its external behavior without changing its internal structure.
Automated Transformations?
Most of us use powerful IDEs to write our code. These IDEs support refactorings, which means that they can do the code alteration for you in a manner that is guaranteed to be safe.
So do we need something similar for transformations? I think not.
Some transformations are so simple in terms of the changes to code, that it wouldn’t actually save any effort to automate them. I don’t see a lot of room for improving the change from if to while, for instance.
Other transformations simply have an unspecified effect. For example, how would you automate the statement->statements transformation?
The crux is that refactorings keep the external behavior the same, and the tools depend on that to properly implement the refactorings. However, transformations don’t share that property.
Standardized Work
In the Specify/Transform/Refactor view of TDD, we write our programs by alternating between adding tests, applying transformations, and applying refactorings.
In other words, if we look at the evolution of our non-test code through a series of diffs, then each diff shows either a transformation or a refactoring.
This time we’ll take a detailed look at the transformations applied in the Green phase.
The Transformation Priority Premise
Most of you will have heard of the refactorings we apply in the last TDD phase, but there are corresponding standardized code changes in the Green phase as well. Uncle Bob Martin named them transformations.
The Transformation Priority Premise (TPP) claims that these transformations have an inherent order, and that picking transformation that are higher on the list leads to better algorithms.
Anecdotal evidence is provided by the example of sorting, where violating the order leads to bubble sort, while the correct order leads to quicksort.
After some modifications based on posts by other people, Uncle Bob arrived at the following ordered list of transformations:
Transformation
Description
{}–>nil
no code at all->code that employs nil
nil->constant
constant->constant+
a simple constant to a more complex constant
constant->scalar
replacing a constant with a variable or an argument
statement->statements
adding more unconditional statements
unconditional->if
splitting the execution path
scalar->array
array->container
??? this one is never used nor explained
statement->tail-recursion
if->while
statement->recursion
expression->function
replacing an expression with a function or algorithm
variable->assignment
replacing the value of a variable
case
adding a case (or else) to an existing switch or if
Applying the TPP to the Roman Numerals Kata
Reading about something gives only shallow knowledge, so let’s try out the TPP on a small, familiar problem: the Roman Numerals kata.
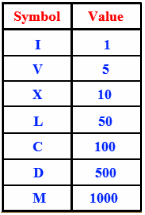
For those of you who are unfamiliar with it: the objective is to translate numbers into Roman. See the table at the left for an overview of the Roman symbols and their values.
As always in TDD, we start off with the simplest case:
public class RomanNumeralsTest {

  @Test
  public void arabicToRoman() {
    Assert.assertEquals("i", "i", RomanNumerals.arabicToRoman(1));
  }

}
We get this to compile with:
public class RomanNumerals {

  public static String arabicToRoman(int arabic) {
    return null;
  }

}
Note that we’ve already applied the first transformation on the list: {}->nil. We apply the second transformation, nil->constant, to get to green:
public class RomanNumerals {

  public static String arabicToRoman(int arabic) {
    return "i";
  }

}
Now we can add our second test:
public class RomanNumeralsTest {

  @Test
  public void arabicToRoman() {
    assertRoman("i", 1);
    assertRoman("ii", 2);
  }

  private void assertRoman(String roman, int arabic) {
    Assert.assertEquals(roman, roman,
        RomanNumerals.arabicToRoman(arabic));
  }

}
The only way to make this test pass, is to introduce some conditional (unconditional->if):
  public static String arabicToRoman(int arabic) {
    if (arabic == 2) {
      return "ii";
    }
    return "i";
  }
However, this leads to duplication between the number 2 and the number of is returned. So let’s try a different sequence of transformations. Warning: I’m going into baby steps mode now.
First, do constant->scalar:
public static String arabicToRoman(int arabic) {
  String result = "i";
  return result;
}
Next, statement->statements:
public static String arabicToRoman(int arabic) {
  StringBuilder result = new StringBuilder();
  result.append("i");
  return result.toString();
}
Now we can introduce the if without duplication:
public static String arabicToRoman(int arabic) {
  StringBuilder result = new StringBuilder();
  if (arabic >= 1) {
    result.append("i");
  }
  return result.toString();
}
And then another statement->statements:
public static String arabicToRoman(int arabic) {
  StringBuilder result = new StringBuilder();
  if (arabic >= 1) {
    result.append("i");
    arabic -= 1;
  }
  return result.toString();
}
And finally we do if->while:
public static String arabicToRoman(int arabic) {
  StringBuilder result = new StringBuilder();
  while (arabic >= 1) {
    result.append("i");
    arabic -= 1;
  }
  return result.toString();
}
Our test now passes. And so does the test for 3, by the way.
With our refactoring hat on, we spot some more subtle duplication: between the number 1 and the string i. They both express the same concept (the number 1), but are different versions of it: one Arabic and one Roman.
We should introduce a class to capture this concept:
public class RomanNumerals {

  public static String arabicToRoman(int arabic) {
    StringBuilder result = new StringBuilder();
    RomanNumeral numeral = new RomanNumeral("i", 1);
    while (arabic >= numeral.getValue()) {
      result.append(numeral.getSymbol());
      arabic -= numeral.getValue();
    }
    return result.toString();
  }

}

public class RomanNumeral {

  private final String symbol;
  private final int value;

  public RomanNumeral(String symbol, int value) {
    this.symbol = symbol;
    this.value = value;
  }

  public int getValue() {
    return value;
  }

  public String getSymbol() {
    return symbol;
  }

}
Now it turns out that we have a case of feature envy. We can make that more obvious by extracting out a method:
public static String arabicToRoman(int arabic) {
  StringBuilder result = new StringBuilder();
  RomanNumeral numeral = new RomanNumeral("i", 1);
  arabic = append(arabic, result, numeral);
  return result.toString();
}

private static int append(int arabic, StringBuilder builder,
    RomanNumeral numeral) {
  while (arabic >= numeral.getValue()) {
    builder.append(numeral.getSymbol());
    arabic -= numeral.getValue();
  }
 return arabic;
}
Now we can move the append() method to RomanNumeral:
public class RomanNumerals {

  public static String arabicToRoman(int arabic) {
    StringBuilder result = new StringBuilder();
    RomanNumeral numeral = new RomanNumeral("i", 1);
    arabic = numeral.append(arabic, result);
    return result.toString();
  }

}

public class RomanNumeral {

  private final String symbol;
  private final int value;

  public RomanNumeral(String symbol, int value) {
    this.symbol = symbol;
    this.value = value;
  }

  public int getValue() {
    return value;
  }

  public String getSymbol() {
    return symbol;
  }

  public int append(int arabic, StringBuilder builder) {
    while (arabic >= getValue()) {
      builder.append(getSymbol());
      arabic -= getValue();
    }
    return arabic;
  }

}
We can further clean up by inlining the getters that are now only used in the RomanNumeral class:
public class RomanNumeral {

  private final String symbol;
  private final int value;

  public RomanNumeral(String symbol, int value) {
    this.symbol = symbol;
    this.value = value;
  }

  public int append(int arabic, StringBuilder builder) {
    while (arabic >= value) {
      builder.append(symbol);
      arabic -= value;
    }
    return arabic;
  }

}
There is one other problem with this code: we pass in arabic and builder as two separate parameters, but they are not independent. The former represents the part of the arabic number not yet processed, while the latter represents the part that is processed. So we should introduce another class to capture the shared concept:
public class RomanNumerals {

  public static String arabicToRoman(int arabic) {
    ArabicToRomanConversion conversion
        = new ArabicToRomanConversion(arabic);
    RomanNumeral numeral = new RomanNumeral("i", 1);
    numeral.append(conversion);
    return conversion.getResult();
  }

}

public class RomanNumeral {

  private final String symbol;
  private final int value;

  public RomanNumeral(String symbol, int value) {
    this.symbol = symbol;
    this.value = value;
  }

  public void append(ArabicToRomanConversion conversion) {
    while (conversion.getRemainder() >= value) {
      conversion.append(symbol, value);
    }
  }

}

public class ArabicToRomanConversion {

  private int remainder;
  private final StringBuilder result;

  public ArabicToRomanConversion(int arabic) {
    this.remainder = arabic;
    this.result = new StringBuilder();
  }

  public String getResult() {
    return result.toString();
  }

  public int getRemainder() {
    return remainder;
  }

  public void append(String symbol, int value) {
    result.append(symbol);
    remainder -= value;
  }

}
Unfortunately, we now have a slight case feature envy in RomanNumeral. We use conversion twice and our own members three times, so it’s not too bad, but let’s think about this for a moment.
Does it make sense to let the roman numeral know about an conversion process from Arabic to Roman? I think not, so let’s move the code to the proper place:
public class RomanNumerals {

  public static String arabicToRoman(int arabic) {
    ArabicToRomanConversion conversion
        = new ArabicToRomanConversion(arabic);
    RomanNumeral numeral = new RomanNumeral("i", 1);
    conversion.process(numeral);
    return conversion.getResult();
  }

}

public class RomanNumeral {

  private final String symbol;
  private final int value;

  public RomanNumeral(String symbol, int value) {
    this.symbol = symbol;
    this.value = value;
  }

  public String getSymbol() {
    return symbol;
  }

  public int getValue() {
    return value;
  }

}

public class ArabicToRomanConversion {

  private int remainder;
  private final StringBuilder result;

  public ArabicToRomanConversion(int arabic) {
    this.remainder = arabic;
    this.result = new StringBuilder();
  }

  public String getResult() {
    return result.toString();
  }

  public void process(RomanNumeral numeral) {
    while (remainder >= numeral.getValue()) {
      append(numeral.getSymbol(), numeral.getValue());
    }
  }

  private void append(String symbol, int value) {
    result.append(symbol);
    remainder -= value;
  }

}
We had to re-introduce the getters for RomanNumeral‘s fields to get this to compile. We could have avoided that rework by introducing the ArabicToRomanConversion class first. Hmm, maybe refactorings have an inherent order too!
OK, on to our next test: 4. We can make that pass with another series of transformations. First, scalar->array:
public static String arabicToRoman(int arabic) {
  ArabicToRomanConversion conversion
      = new ArabicToRomanConversion(arabic);
  RomanNumeral[] numerals = new RomanNumeral[] {
    new RomanNumeral("i", 1)
  };
  conversion.process(numerals[0]);
  return conversion.getResult();
}
Next, constant->scalar:
public static String arabicToRoman(int arabic) {
  ArabicToRomanConversion conversion
      = new ArabicToRomanConversion(arabic);
  RomanNumeral[] numerals = new RomanNumeral[] {
    new RomanNumeral("i", 1)
  };
  int index = 0;
  conversion.process(numerals[index]);
  return conversion.getResult();
}
Now we need an if:
public static String arabicToRoman(int arabic) {
  ArabicToRomanConversion conversion
      = new ArabicToRomanConversion(arabic);
  RomanNumeral[] numerals = new RomanNumeral[] {
    new RomanNumeral("i", 1)
  };
  int index = 0;
  if (index < 1) {
    conversion.process(numerals[index]);
  }
  return conversion.getResult();
}
And another constant->scalar:
public static String arabicToRoman(int arabic) {
  ArabicToRomanConversion conversion
      = new ArabicToRomanConversion(arabic);
  RomanNumeral[] numerals = new RomanNumeral[] {
    new RomanNumeral("i", 1)
  };
  int index = 0;
  if (index < numerals.length) {
    conversion.process(numerals[index]);
  }
  return conversion.getResult();
}
You can probably see where this is going. Next is statement->statements:
public static String arabicToRoman(int arabic) {
  ArabicToRomanConversion conversion
      = new ArabicToRomanConversion(arabic);
  RomanNumeral[] numerals = new RomanNumeral[] {
    new RomanNumeral("i", 1)
  };
  int index = 0;
  if (index < numerals.length) {
    conversion.process(numerals[index]);
    index++;
  }
  return conversion.getResult();
}
Then if->while:
public static String arabicToRoman(int arabic) {
  ArabicToRomanConversion conversion
      = new ArabicToRomanConversion(arabic);
  RomanNumeral[] numerals = new RomanNumeral[] {
    new RomanNumeral("i", 1)
  };
  for (RomanNumeral numeral : numerals) {
    conversion.process(numeral);
  }
  return conversion.getResult();
}
And finally constant->constant+:
public static String arabicToRoman(int arabic) {
  ArabicToRomanConversion conversion
      = new ArabicToRomanConversion(arabic);
  RomanNumeral[] numerals = new RomanNumeral[] {
    new RomanNumeral("iv", 4),
    new RomanNumeral("i", 1)
  };
  for (RomanNumeral numeral : numerals) {
    conversion.process(numeral);
  }
  return conversion.getResult();
}
Now we have our algorithm complete and all we need to do is add to the numerals array. BTW, this should be a constant:
public class RomanNumerals {

  private static final RomanNumeral[] ROMAN_NUMERALS
      = new RomanNumeral[] {
    new RomanNumeral("iv", 4),
    new RomanNumeral("i", 1)
  };

  public static String arabicToRoman(int arabic) {
    ArabicToRomanConversion conversion
        = new ArabicToRomanConversion(arabic);
    for (RomanNumeral romanNumeral : ROMAN_NUMERALS) {
      conversion.process(romanNumeral);
    }
    return conversion.getResult();
  }

}
Also, it looks like we have another case of feature envy here that we could resolve as follows:
public class RomanNumerals {

  public static String arabicToRoman(int arabic) {
    return new ArabicToRomanConversion(arabic).getResult();
  }

}

public class ArabicToRomanConversion {

  private static final RomanNumeral[] ROMAN_NUMERALS
      = new RomanNumeral[] {
    new RomanNumeral("iv", 4),
    new RomanNumeral("i", 1)
  };

  private int remainder;
  private final StringBuilder result;

  public ArabicToRomanConversion(int arabic) {
    this.remainder = arabic;
    this.result = new StringBuilder();
  }

  public String getResult() {
    for (RomanNumeral romanNumeral : ROMAN_NUMERALS) {
      process(romanNumeral);
    }
    return result.toString();
  }

  private void process(RomanNumeral numeral) {
    while (remainder >= numeral.getValue()) {
      append(numeral.getSymbol(), numeral.getValue());
    }
  }

  private void append(String symbol, int value) {
    result.append(symbol);
    remainder -= value;
  }

}
Retrospective
The first thing I noticed, is that following the TPP led me to discover the basic algorithm a lot quicker than in some of my earlier attempts at this kata.
The next interesting thing is that there seems to be an interplay between transformations and refactorings.
You can either perform a transformation and then clean up with refactorings, or prevent the need to refactor by using only transformations that don’t introduce duplication. Doing the latter is more efficient and also seems to speed up discovery of the required algorithm.
Certainly food for thought. It seems like some more experimentation is in order.
Update: Here is a screencast of a slightly better version of the kata:
There seems to be some confusion between Test-First Programming and Test-Driven Development (TDD).
This post explains that merely writing the tests before the code doesn’t necessarily make it TDD.
Similarities Between Test-First Programming and Test-Driven Development
It’s not hard to see why people would confuse the two, since they have many things in common.
My classification of tests distinguishes six dimensions: who, what, when, where, why, and how.
Test-First programming and Test-Driven Development score the same in five of those six dimensions: they are both automated (how) functional (what) programmer (who) tests at the unit level (where) written before the code (when).
The only difference is in why they are written.
Differences Between Test-First Programming and Test-Driven Development
Test-First Programming mandates that tests be written before the code, so that the code will always be testable. This is more efficient than having to change already written code to make it testable.
Test-First Programming doesn’t say anything about other activities in the development cycle, like requirements analysis and design.
This is a big difference with Test-Driven Development (TDD), since in TDD, the tests drive the design. Let’s take a detailed look at the TDD process of Red/Green/Refactor, to find out exactly how that differs from Test-First Programming.
Red
In the first TDD phase we write a test. Since there is no code yet to make the test pass, this test will fail.
Unit testing frameworks like JUnit will show the result in red to indicate failure.
In both Test-First Programming and Test-Driven Development, we use this phase to record a requirement as a test.
TDD, however, goes a step further: we also explicitly design the client API. Test-First Programming is silent on how and when we should do that.
Green
In the next phase, we write code to make the test pass. Unit testing frameworks show passing tests in green.
In Test-Driven Development, we always write the simplest possible code that makes the test pass. This allows us to keep our options open and evolve the design.
We may evolve our code using simple transformations to increase the complexity of the code enough to satisfy the requirements that are expressed in the tests.
Test-First Programming is silent on what sort of code you write in this phase and how you do it, as long as the test will pass.
Refactor
In the final TDD phase, the code is refactored to improve the design of the implementation.
This phase is completely absent in Test-First Programming.
Summary of Differences
So we’ve uncovered two differences that distinguish Test-First Programming from Test-Driven Development:
Test-Driven Development uses the Red phase to design the client API. Test-First Programming is silent on when and how you arrive at a good client API.
Test-Driven Development splits the coding phase into two compared to Test-First Programming. In the first sub-phase (Green), the focus is on meeting the requirements. In the second sub-phase (Refactor), the focus is on creating a good design.
I think there is a lot of value in the second point. Many developers focus too much on getting the requirements implemented and forget to clean up their code. The result is an accumulation of technical debt that will slow development down over time.
TDD also splits the design activity into two. First we design the external face of the code, i.e. the API. Then we design the internal organization of the code.
This is a useful distinction as well, because the heuristics you would use to tell a good API from a bad one are different from those for good internal design.
Try Before You Buy
All in all I think Test-Driven Development provides sufficient value over Test-First Programming to give it a try.
All new things are hard, however, so be sure to practice TDD before you start applying it in the wild.
Many applications benefit from being open to extension. This post describes two ways to implement such extensibility in Java.
Extensible Applications
Extensible applications are applications whose functionality can be extended without having to recompile them and sometimes even without having to restart them. This may happen by simply adding a jar to the classpath, or by a more involved installation procedure.
One example of an extensible application is the Eclipse IDE. It allows extensions, called plug-ins, to be installed so that new functionality becomes available. For instance, you could install a Source Code Management (SCM) plug-in to work with your favorite SCM.
As another example, imagine an implementation of the XACML specification for authorization. The “X” in XACML stands for “eXtensible” and the specification defines a number of extension points, like attribute and category IDs, combining algorithms, functions, and Policy Information Points. A good XACML implementation will allow you to extend the product by providing a module that implements the extension point.
In this approach, an extension point is defined by an interface:
package com.company.application;

public interface MyService {
  // ...
}
You can find all extensions for such an extension point by using the ServiceLoader class:
public class Client {

  public void useService() {
    Iterator<MyService> services = ServiceLoader.load(
        MyService.class).iterator();
    while (services.hasNext()) {
      MyService service = services.next();
      // ... use service ...
  }

}
An extension for this extension point can be any class that implements that interface:
package com.company.application.impl;

public class MyServiceImpl implements MyService {
  // ...
}
The implementation class must be publicly available and have a public no-arg constructor. However, that’s not enough for the ServiceLoader class to find it.
You must also create a file named after the fully qualified name of the extension point interface in META-INF/services. In our example, that would be:
This file must be UTF-8 encoded, or ServiceLoader will not be able to read it. Each line of this file should contain the fully qualified name of one extension implementing the extension point, for instance:
com.company.application.impl.MyServiceImpl
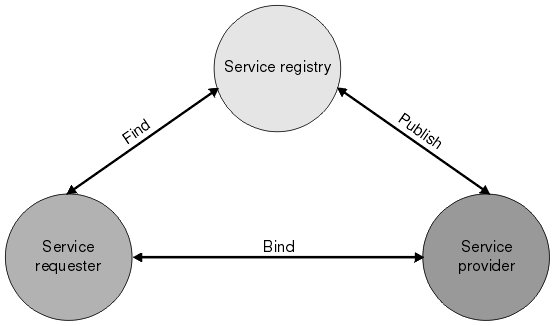
OSGi Services
The SPI approach described above only works when the extension point files are on the classpath.
In an OSGi environment, this is not the case. Luckily, OSGi has its own solution to the extensibility problem: OSGi services.
@Service
@Component
public class MyServiceImpl implements MyService {
  // ...
}
With OSGi and SCR, it is also very easy to use a service:
@Component
public class Client {

  @Reference
  private MyService myService;

  protected void bindMyService(MyService bound) {
    myService = bound;
  }

  protected void unbindMyService(MyService bound) {
    if (myService == bound) {
      myService = null;
    }
  }

  public void useService() {
    // ... use myService ...
  }

}
Best of Both Worlds
So which of the two options should you chose? It depends on your situation, of course. When you’re in an OSGi environment, the choice should obviously be OSGi services. If you’re not in an OSGi environment, you can’t use those, so you’re left with SPI.
But what if you’re writing a framework or library and you don’t know whether your code will be used in an OSGi or classpath based environment?
You will want to serve as many uses of your library as possible, so the best would be to support both models. This can be done if you’re careful.
Note that adding a Declarative Services service component file like OSGI-INF/myServiceComponent.xml to your jar (which is what the SCR annotations end up doing when they are processed) will only work in an OSGi environment, but is harmless outside OSGi.
Likewise, the SPI service file will work in a traditional classpath environment, but is harmless in OSGi.
So the two approaches are actually mutually exclusive and in any given environment, only one of the two approaches will find anything. Therefore, you can write code that uses both approaches. It’s a bit of duplication, but it allows your code to work in both types of environments, so you can have your cake and eat it too.
Chapter 1, The Software Security Problem, explains why security is easy to get wrong and why typical methods for catching bugs aren’t effective for finding security vulnerabilities.
Chapter 2, Introduction to Static Analysis, explains that static analysis involves a software program checking the source code of another software program to find structural, quality, and security problems.
Chapter 3, Static Analysis as Part of Code Review, explains how static code analysis can be integrated into a security review process.
Chapter 4, Static Analysis Internals, describes how static analysis tools work internally and what trade-offs are made when building them.
This concludes the first part of the book that describes the big picture. Part two deals with pervasive security problems.
Chapter 5, Handling Input, describes how programs should deal with untrustworthy input.
Chapter 6, Buffer Overflow, and chapter 7, Bride to Buffer Overflow, deal with buffer overflows. These chapters are not as interesting for developers working with modern languages like Java or C#.
Chapter 8, Errors and Exceptions, talks about unexpected conditions and the link with security issues. It also handles logging and debugging.
Chapter 9, Web Applications, starts the third part of the book about common types of programs. This chapter looks at security problems specific to the Web and HTTP.
Chapter 10, XML and Web Services, discusses the security challenges associated with XML and with building up applications from distributed components.
Chapter 11, Privacy and Secrets, switches the focus from AppSec to InfoSec with an explanation of how to protect private information.
Chapter 12, Privileged Programs, continues with a discussion on how to write programs that operate with different permissions than the user.
The final part of the book is about gaining experience with static analysis tools.
Chapter 13, Source Code Analysis Exercises for Java, is a tutorial on how to use Fortify (a trial version of which is included with the book) on some sample Java projects.
Chapter 14, Source Code Analysis Exercises for C does the same for C programs.
This book is very useful for anybody working with static analysis tools. Its description of the internals of such tools helps with understanding how to apply the tools best.
I like that the book is filled with numerous examples that show how the tools can detect a particular type of problem.
Finally, the book makes clear that any static analysis tool will give both false positives and false negatives. You should really understand security issues yourself to make good decisions. When you know how to do that, a static analysis tool can be a great help.
This post describes how to use the Java Cryptography Architecture (JCA) that allows you to use cryptographic services in your applications.
Java Cryptography Architecture Services
The JCA provides a number of cryptographic services, like message digests and signatures. These services are accessible through service specific APIs, like MessageDigest and Signature. Cryptographic services abstract different algorithms. For digests, for instance, you could use MD5 or SHA1. You specify the algorithm as a parameter to the getInstance() method of the cryptographic service class:
You find the value of the parameter for your algorithm in the JCA Standard Algorithm Name Documentation. Some algorithms have parameters. For instance, an algorithm to generate a private/public key pair will take the key size as a parameter. You specify the parameter(s) using the initialize() method:
If you don’t call the initialize() method, some default value will be used, which may or may not be what you want. Unfortunately, the API for initialization is not 100% consistent across services. For instance, the Cipher class uses init() with an argument indicating encryption or decryption, while the Signature class uses initSign() for signing and initVerify() for verification.
Java Cryptography Architecture Providers
The JCA keeps your code independent from a particular cryptographic algorithm’s implementation through the provider system. Providers are ranked according to a preference order, which is configurable (see below). The best preference is 1, the next best is 2, etc. The preference order allows the JCA to select the best available provider that implements a given algorithm. Alternatively, you can specify a specific provider in the second argument to getInstance():
You should always make sure that the cryptographic services that your application uses are configurable.If you do that, you can change the cryptographic algorithm and/or implementation without issuing a patch. This is particularly valuable when a new attack on an (implementation of an) algorithm becomes available. The JCA makes it easy to configure the use of cryptography. The getInstance() method accepts both the name of the algorithm and the name of the provider implementing that algorithm. You should read both and any values for the algorithm’s parameters from some sort of configuration file. Also make sure you keep your code DRY and instantiate cryptographic services in a single place. Check that the requested algorithm and/or provider are actually available. The getInstance() method throws NoSuchAlgorithmException when a given algorithm or provider is not available, so you should catch that. The safest option then is to fail and have someone make sure the system is configured properly. If you continue despite a configuration error, you may end up with a system that is less secure than required. Note that Oracle recommends not specifying the provider. The reasons they provide is that not all providers may be available on all platforms, and that specifying a provider may mean that you miss out on optimizations. You should weigh those disadvantages against the risk of being vulnerable. Deploying specific providers with known characteristics with your application may neutralize the disadvantages that Oracle mentions.
Adding Cryptographic Service Providers
The provider system is extensible, so you can add providers. For example, you could use the open source Bouncy Castle or the commercial RSA BSAFE providers. In order to add a provider, you must make sure that its jar is available to the application. You can put it on the classpath for this purpose. Alternatively, you can make it an installed extension by placing it in the $JAVA_HOME/lib/ext directory, where $JAVA_HOME is the location of your JDK/JRE distribution. The major difference between the two approaches is that installed extensions are granted all permissions by default whereas code on the classpath is not. This is significant when (part of) your code runs in a sandbox. Some services, like Cipher, require the provider jar to be signed. The next step is to register the provider with the JCA provider system. The simplest way is to use Security.addProvider():
One downside of this approach is that it couples your code to the provider, since you have to import the provider class. This may not be an important issue in an modular system like OSGi. Another thing to look out for is that code requires SecurityPermission to add a provider programmatically. The provider can also be configured as part of your environment via static registration by adding an entry to the java.security properties file (found in $JAVA_HOME/jre/lib/security/java.security):
The property names in this file start with security.provider. and end with the provider’s preference. The property value is the fully qualified name of the class implementing Provider.
Implementing Your Own Cryptographic Service Provider
Don’t do it. You will get it wrong and be vulnerable to attacks.
Using Cryptographic Service Providers
The documentation for the provider should tell you what provider name to use as the second argument to getInstance(). For instance, Bouncy Castle uses BC, while RSA BSAFE uses JsafeJCE. Most providers have custom APIs as well as JCA conformant APIs. Do not use the custom APIs, since that will make it impossible to configure the algorithms and providers used.
Not All Algorithms and Implementations Are Created Equal
It’s important to note that different algorithms and implementations have different characteristics and that those may make them more or less suitable for your situation. For instance, some organizations will only allow algorithms and implementations that are FIPS 140-2 certified or are on the list of NSA Suite B cryptographic algorithms. Always make sure you understand your customer’s cryptographic needs and requirements.
Using JCA in an OSGi environment
The getInstance() method is a factory method that uses the Service Provider Interface (SPI). That is problematic in an OSGi world, since OSGi violates the SPI framework’s assumption that there is a single classpath. Another potential issue is that JCA requires some jars to be signed. If those jars are not valid OSGi bundles, you can’t run them through bnd to make them so, since that would make the signature invalid. Fortunately, you can kill both birds with one stone. Put your provider jars on the classpath of your main program, that is the program that starts the OSGi framework. Then export the provider package from the OSGi system bundle using the org.osgi.framework.system.packages.extra system property. This will make the system bundle export that package. Now you can simply use Import-Package on the provider package in your bundles. There are other options for resolving these problems if you can’t use the above solution.
In a previous post, we looked at implementing a sandbox for Java applications in which we can securely run mobile code.
This post looks at how to do the same in an OSGi environment.
OSGi
The OSGi specification defines a dynamic module system for Java. As such, it’s a perfect candidate for implementing the kind of plugin system that would enable your application to dynamically add mobile code.
Security in OSGi builds on the Java 2 security architecture that we discussed earlier, so you can re-use your knowledge about code signing, etc.
OSGi goes a couple of steps further, however.
Revoking Permissions
One of the weaknesses in the Java permissions model is that you can only explicitly grant permissions, not revoke them. There are many cases where you want to allow everything except a particular special case.
There is no way to do that with standard Java permissions, but, luckily, OSGi introduces a solution.
The downside is that OSGi introduces its own syntax for specifying policies.
The following example shows how to deny PackagePermission for subpackages of com.acme.secret:
(In this and following examples, I give the simple name of permission classes instead of the fully qualified name. I hint at that by prefixing the simple name with ..)
PackagePermission is a permission defined by OSGi for authorization of package imports and exports. Your application could use a policy like this to make sure that mobile code can’t call the classes in a given package, for instance to limit direct access to the database.
Extensible Conditions on Permissions
The second improvement that OSGi brings is that the conditions under which a permission are granted can be dynamically evaluated at runtime.
The following example shows how to conditionally grant ServicePermission:
The condition is the part between square brackets. OSGi defines two conditions, which correspond to the signedBy and codeBase constructs in regular Java policies.
You can also define your own conditions. The specification gives detailed instructions on implementing conditions, especially with regard to performance.
Different Types of Permissions
The final innovation that OSGi brings to the Java permissions model, is that there are different types of permissions.
Bundles can specify their own permissions. This doesn’t mean that bundles can grant themselves permissions, but rather that they can specify the maximum privileges that they need to function. These permissions are called local permissions.
The OSGi framework ensures that the bundle will never have more permissions than the local permissions, thus implementing the principle of least privilege.
Actually, that statement is not entirely accurate. Every bundle will have certain permissions that they need to function in an OSGi environment, like being able to read the org.osgi.framework.* system properties.
These permissions are called implicit permissions, since every bundle will have them, whether the permissions are explicitly granted to the bundle or not.
The final type of permissions are the system permissions. These are the permissions that are granted to the bundle.
The effective permissions are the set of permissions that are checked at runtime:
effective = (local ∩ system) ∪ implicit
Local permissions enable auditing. Before installing a bundle into your OSGi environment, you can inspect the Bundle Permission Resource in OSGI-INF/permissions.perm to see what permissions the bundle requires.
If you are not comfortable with granting the bundle these permissions, you can decide to not install the bundle. The point is that you can know all of this without running the bundle and without having access to its source code.
Integration into the Java Permissions Model
The OSGi framework integrates their extended permissions model into the standard Java permissions model by subclassing ProtectionDomain.
This approach allows OSGi to tap into the standard Java permissions model that you have come to know, so you can re-use most of your skills in this area. The only thing you’ll have to re-learn, is how to write policies.
Comparison of Permission Models
To put the OSGi permission model into perspective, consider the following comparison table, which uses terminology from the XACML specification:
Permission Models
Standard Java
OSGi
Effects
permit
permit, deny
Target, Condition
codeBase, signedBy
codeBase, signedBy, custom conditions
Combining Algorithms
first-applicable
first-applicable, local/system/implicit
From this table you can see that the OSGi model is quite a bit more expressive than the standard Java permission model, although not as expressive as XACML.
The following is a permission to read the file /home/remon/thesis.pdf:
Permission readPermission = new java.io.FilePermission(
    "/home/remon/thesis.pdf", "read");
You can grant a piece of code permissions to do anything and everything by granting it AllPermission. This has the same effect as running it without SecurityManager.
Policies
Permissions are granted using policies. A Policy is responsible for determining whether code has permission to perform a security-sensitive operation.
The AccessController consults the Policy to see whether a Permission is granted.
There can only be one Policy object in use at any given time. Application code can subclass Policy to provide a custom implementation.
You can create additional policy configuration files using the PolicyTool program. Each configuration file must be encoded in UTF-8.
By default, code is granted no permissions at all. Every grant statement adds some permissions. Permissions that are granted cannot be revoked.
The following policy fragment grants code that originates from the /home/remon/code/ directory read permission to the file /home/remon/thesis.pdf:
grant codeBase "file:/home/remon/code/-" {
    permission java.io.FilePermission "/home/remon/thesis.pdf",
        "read";
};
Note that the part following codeBase is a URL, so you should always use forward slashes, even on a Windows system.
A codeBase with a trailing / matches all class files (not JAR files) in the specified directory. A codeBase with a trailing /* matches all files (both class and JAR files) contained in that directory. A codeBase with a trailing /- matches all files (both class and JAR files) in the directory and recursively all files in subdirectories contained in that directory.
For paths in file permissions on Windows systems, you need to use double backslashes (\\), since the \ is an escape character:
grant codeBase "file:/C:/Users/remon/code/-" {
    permission java.io.FilePermission
        "C:\\Users\\remon\\thesis.pdf", "read";
};
For more flexibility, you can write grants with variable parts. We already saw the codeBase wildcards. You can also substitute system properties:
grant codeBase "file:/${user.home}/code/-" {
    permission java.io.FilePermission
        "${user.home}${/}thesis.pdf", "read";
};
Note that ${/} is replaced with the path separator for your system. There is no need to use that in codeBase, since that’s a URL.
Signed Code
Of course, we should make sure that the code we use is signed, so that we know that it actually came from who we think it came from.
We can test for signatures in our policies using the signedBy clause:
keystore "my.keystore";
grant signedBy "signer.alias", codeBase ... {
  ...
};
This policy fragment uses the keystore with alias my.keystore to look up the public key certificate with alias signer.alias.
It then verifies that the executing code was signed by the private key corresponding to the public key in the found certificate.
There can be only one keystore entry.
The combination of codeBase and signedBy clauses specifies a ProtectionDomain. All classes in the same ProtectionDomain have the same permissions.
Privileged Code
Whenever a resource access is attempted, all code on the stack must have permission for that resource access, unless some code on the stack has been marked as privileged.
Marking code as privileged enables a piece of trusted code to temporarily enable access to more resources than are available directly to the code that called it. In other words, the security system will treat all callers as if they originated from the ProtectionDomain of the class that issues the privileged call, but only for the duration of the privileged call.
 Last time I shared some tips on how to use libraries well. I now want to delve deeper into one of those: Know What Libraries You Use.
 There are many good reasons to use code written by others in your application.
 This post examines how well we really understand the practice of Test-Driven Development (TDD).
 Refactorings are standard alterations of the code that change its internal structure without changing its external behavior.
 The crux is that refactorings keep the external behavior the same, and the tools depend on that to properly implement the refactorings. However, transformations don’t share that property.
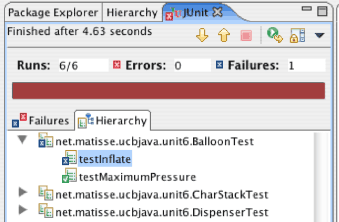
 Reading about something gives only shallow knowledge, so let’s try out the TPP on a small, familiar problem: the
  The first thing I noticed, is that following the TPP led me to discover the basic algorithm a lot quicker than in some of my earlier attempts at this kata.
 In the first TDD phase we write a test. Since there is no code yet to make the test pass, this test will fail.
 We may evolve our code using simple
  All in all I think Test-Driven Development provides sufficient value over Test-First Programming to give it a try.
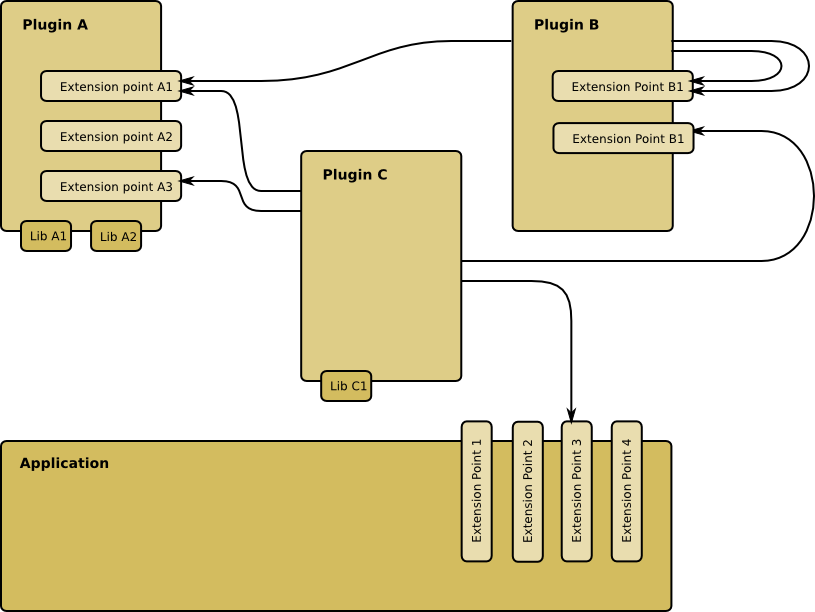
 But what if you’re writing a framework or library and you don’t know whether your code will be used in an OSGi or classpath based environment?
 Chapter 5, Handling Input, describes how programs should deal with untrustworthy input.
 Chapter 11, Privacy and Secrets, switches the focus from
 If you don’t call the
  If you do that, you can change the cryptographic algorithm and/or implementation without issuing a patch. This is particularly valuable when a new attack on an (implementation of an) algorithm becomes available. The JCA makes it easy to configure the use of cryptography. The
 Another thing to look out for is that code requires

 There is no way to do that with standard Java permissions, but, luckily, OSGi introduces a solution.
 The OSGi framework integrates their extended permissions model into the standard Java permissions model by subclassing
  In a previous post, we looked at
  The
The  This policy fragment uses the

You must be logged in to post a comment.