Chapter 1, How Good We Had It, observes that purchased tech products are traditionally paid for up front, while usage starts (much) later, which means the risk is on the buyer to derive value from the purchase.
Since vendors add features to their products faster than customers can consume them, we have a Consumption Gap: the difference between the potential value of a product and the value that is actually realized.
Customers are changing their attitude towards the Consumption Gap and its risk. The economic downturn encourages businesses to cut costs, cloud computing shifts the buying model from CapEx to OpEx, and the iPhone’s App Store has brought choice to computing.
Chapter 2, Shifting Clouds and Changing Rules, explains that the risk of monetizing the investment in tech products will shift to vendors, who will have to survive off micro-transactions (MTs). The cloud will bring prices down to the point of retail-like price wars. Vertical market focus and business process expertise will become the new high-value service capabilities.
Influence will shift from IT departments to end users, who are the ones making the MTs. Tech companies are not used to deal with them, but real-time usage data will change that and lead to the discovery of best-practice utilization patterns.
Chapter 3, Looking Over the Margin Wall, explains that tech is not immune to commoditization. Price competition will kick in and margins will decrease. When we hit this Margin Wall, the only viable strategy is to start over with a new product. The cloud’s low switching costs are decreasing the runway to commoditization.
Things look differently on the other side of the Margin Wall. Revenue is based on MTs, so no usage means no money. The Consumption Gap is now the provider’s problem: they need to make sure their product’s advanced features get used. They must build sophisticated Consumption Models.
Chapter 4, Learning to Love Micro-Transactions, argues that in an OpEx model, volume matters and vendor must learn how to drive MTs. This means more features per user, more apps per user, and more users per month. Even on-premise solutions will move to OpEx models.
We’ll need automated ways to sell electronically in the context of the user’s workflow. We can learn a lot from games, where users get constant feedback, are recognized with rewards and status, and are part of a community in which to share and compete.
Customers must learn this new model as well. Their costs will become less predictable, and purchasing power will trickle down to end users. The role of the IT department will change with new policies like Bring Your Own Device (BYOD).
Chapter 5, The Data Piling Up in the Corner, argues for aggregating and analyzing usage data to build Consumption Models that drive usage. Cloud computing enables that, since all user interactions are recorded on the server.
We need to identify Consumption Roadmaps, best practices for consuming value from our products, and we need our product to guide the end user according to priorities set by the customer.
This requires an e-commerce layer in our products and our organization. Service and field staff will be armed with detailed usage data to better help customers.
Chapter 6, Consumption Development: The Art and Science of Intelligent Listening, explains that with deployment in the cloud, we no longer need to get every thing right from the start, but we can also no longer sit back after a release. We need to actively drive usage based on usage statistics.
Intelligent Listening predicts new wanted features from usage data and monitoring of social media. Consumption Innovation executes on this learning through capabilities to simplify usage and guide users along predetermined paths. In-Product Up-sell bakes in recommendation engines and offer-management capabilities to present users with new features they are likely to want.
Implementing these changes cost money. To fund them, get rid of products that don’t generate profit, as they take up development time and effort.
Chapter 7, Consumption Marketing: Micro-Marketing and Micro-Buzz, describes how the shift to decision making by end users and the data we have about their behavior will change marketing.
Usage data must be combined with information from services, development, and road maps to form Best Consumption Practices.
Marketing must segment users, identify high value capabilities per segment, figure out what sequence of adoption worked to get there, how to guide others along the same paths, and when and where to trigger offers. Offers need to bring real value to the users to drive trust.
Chapter 8, Consumption Sales: After a Great Run, the Classic Model Gets an Overhaul, posits that the old sales model that was based on standardization breaks down with increased complexity of the product and individuality of its users. Instead we need consulting skills and service-oriented compensation models and salespeople with business expertise.
The new sales steps are: win the platform sale, sell the pay-per-use model, and expand the platform agreement by arming the sales force with consumption research.
Chapter 9, Consumption Services: Will They Someday Own “The Number”?, describes how most current revenue from services is in activities like installation, implementation, integration, and maintenance, and how those will largely go away in the cloud.
The customer service and support team is our best bet for driving MTs, because of their cost structure and remotely operated tools. Their role will have to change from minimizing cost to maximizing customer value by adding new inside sales capabilities.
The Account Services Organization (ASO) will closely tie support with professional services and customer engagement. Expertise will shift away from the technical and towards the business to better help the customer gain value from the system. The ASO will need to learn how to sell MTs and build the Consumption Road-map.
Chapter 10, Customer Demand vs. Capital Markets: How Fast Should You Transform?, talks about the balancing act between transforming ourselves and meeting Wall Street’s short-term expectations. Timing is crucial, as we need some runway to fly over the Margin Wall.
The chapter describes some ways to “buy runway” to get you through the transformation period.
Chapter 11, The “S” Stands for Services, argues that the future of technology is in services and that the cloud is all about services.
Tomasz argues that a better way to organize software development is to make sure that breaking changes don’t affect your team mates. I agree.
Broken Builds Create Friction
Breaking changes from your co-workers are a form of friction, since they take away time and focus from your job. Tomasz’ setup has less friction than ours.
But I feel we can do better still. In a perfect Frictionless Development Environment (FDE), all friction is removed. So what would that look like with regard to version control?
With current version control systems, there is lots of friction. I complained about Perforce before because of that.
Git is much better, but even then there are steps that have to be performed that take away focus from the real goal you’re trying to achieve: solving the customer’s problem using software.
For instance, you still have to create a new topic branch to work on. And you have to merge it with the main development line. In a perfect world, we wouldn’t have to do that.
Frictionless Version Control
So how would a Frictionless Development Environment do version control for us?
Knowing when to create a branch is easy.
All work happens on a topic branch, so every time you start to work on something, the FDE could create a new branch.
The problem is knowing when to merge. But even this is not as hard as it seems.
You’re done with your current work item (user story or whatever you want to call it) when it’s coded, all the tests pass, and the code is clean.
So how would the FDE know when you’re done thinking of new tests for the story?
Well, if you practice Behavior-Driven Development (BDD), you start out with defining the behavior of the story in automated tests. So the story is functionally complete when there is a BDD test for it, and all scenarios in that test pass.
Now we’re left with figuring out when the code is clean. Most teams have a process for deciding this too. For instance, code is clean when static code analysis tools like PMD, CheckStyle, and FindBugs give no warnings.
Some people will argue that we need a minimum amount of code coverage from our tests as well. Or that the code needs to be reviewed by a co-worker. Or that Fortify must not find security vulnerabilities. That’s fine.
The basic point is that we can formally define a pipeline of processes that we want to run automatically.
At each stage of the pipeline can we reject the work. Only when all stages complete successfully, are we done.
And then the FDE can simply merge the branch with the main line, and delete it. Zero friction from version control.
What do you think?
Would you like to lubricate your version control experience? Do you think an automated branching strategy as outlined above would work?
One of the challenges of maintaining a consistent programming style in a team is for everyone to have the same workspace settings, especially in the area of compiler warnings.
Every time a new member joins the team, an existing member sets up a new environment, or a new version of the compiler comes along, you havebook.e to synchronize settings.
My team recently started using Workspace Mechanic, an Eclipse plug-in that allows you to save those settings in an XML file that you put under source control.
The plug-in periodically compares the workspace settings with the contents of that file. It notifies you in case of differences, and allows you to update your environment with a couple of clicks.
Towards a Frictionless Development Environment
Workspace Mechanic is a good example of a lubricant, a tool that lubricates the development process to reduce friction.
My ideal is to take this to the extreme with a Frictionless Development Environment (FDE) in which all software development activities go very smoothly.
Let’s see what we would likely need to make such an FDE a reality.
In this post, I will look at a very small example that uncovers some of the basic components of an FDE.
It would be nicer if the IDE would understand what you’re trying to do and automatically create the skeleton for the class under test for you and save it in the right place.
The crux is for the tool to understand what you are doing, or else it could easily draw the wrong conclusion and create all kinds of artifacts that you don’t want.
This kind of knowledge is highly user and potentially even project specific. It is therefore imperative that the tool collects usage data and uses that to optimize its assistance. We’re likely talking about big data here.
Given the fact that it’s expensive in terms of storage and computing power to collect and analyze these statistics, it makes sense to do this in a cloud environment.
That will also allow for quicker learning of usage patterns when working on different machines, like in the office and at home. More importantly, it allows building on usage patterns of other people.
What this example also shows, is that we’ll need many small, very focused lubricants. This makes it unlikely for one organization to provide all lubricants for an FDE that suits everybody, even for a specific language.
The only practical way of assembling an FDE is through a plug-in architecture for lubricants.
Building an FDE will be a huge effort. To realize it on the short term, we’ll probably need an open source model. No one company could put in the resource required to pull this off in even a couple of years.
The Essential Components of a Frictionless Development Environment
This small example uncovered the following building blocks for a Frictionless Development Environment:
Cloud Computing will provide economies of scale and access from anywhere
Big Data Analytics will discern usage patterns
Recommendation Engines will convert usage patterns into context-aware lubricants
A Plug-in architecture will allow different parties to contribute lubricants and usage analysis tools
An Open Source model will allow many organizations and individuals to collaborate
What do you think?
Do you agree with the proposed components of an FDE? Did I miss something?
I once joined a project where running the “unit” tests took three and a half hours.
As you may have guessed, the developers didn’t run the tests before they checked in code, resulting in a frequently red build.
Running the tests just gave too much friction for the developers.
I define friction as anything that resist the developer while she is producing software.
Since then, I’ve spotted friction in numerous places while developing software.
Friction in Software Development
Since friction impacts productivity negatively, it’s important that we understand it. Here are some of my observations:
Friction can come from different sources.
It can result from your tool set, like when you have to wait for Perforce to check out a file over the network before you can edit it.
Friction can also result from your development process, for example when you have to wait for the QA department to test your code before it can be released.
Friction can operate on different time scales.
Some friction slows you down a lot, while others are much more benign. For instance, waiting for the next set of requirements might keep you from writing valuable software for weeks.
On the other hand, waiting for someone to review your code changes may take only a couple of minutes.
Friction can be more than simple delays.
It also rears its ugly head when things are more difficult then they ought to be.
In the vi editor, for example, you must switch between command and insert modes. Seasoned vi users are just as fast as with editors that don’t have that separation. Yet they do have to keep track of which mode they are in, which gives them a higher cognitive load.
Lubricating Software Development
There has been a trend to decrease friction in software development.
Tools like Integrated Development Environments have eliminated many sources of friction.
For instance, Eclipse will automatically compile your code when you save it.
Automated refactorings decrease both the time and the cognitive load required to make certain code changes.
On the process side, things like Agile development methodologies and the DevOps movement have eliminated or reduced friction. For instance, continuous deployment automates the release of software into production.
These lubricants have given us a fighting chance in a world of increasing complexity.
Frictionless Software Development
It’s fun to think about how far we could take these improvements, and what the ultimate Frictionless Development Environment (FDE) might look like.
My guess is that it would call for the combination of some of the same trends we already see in consumer and enterprise software products. Cloud computing will play a big role, as will simplification of the user interaction, and access from anywhere.
What do you think?
What frictions have you encountered? Do you think frictions are the same as waste in Lean?
What have you done to lubricate the frictions away? What would your perfect FDE look like?
Last time I shared some tips on how to use libraries well. I now want to delve deeper into one of those: Know What Libraries You Use.
Last week I set out to create such a list of embedded components for our product. This is a requirement for our Security Development Lifecycle (SDL).
However, it’s not a fun task. As a developer, I want to write code, not update documents! So I turned to my friends Gradle and Groovy, with a little help from Jenkins and Confluence.
Our build defines a list of names of configurations for embedded components, copyBundleConfigurations, for copying those to the distribution directory. From there, I get to the external dependencies using Groovy’s collection methods:
However, Gradle dependencies don’t contain all the required information.
For instance, we need the license under which the library is distributed, so that we can ask the Legal department permission for using it.
So I added a simple XML file to hold the additional info. Combining that information with the dependencies that Gradle maintains is easy using Groovy’s XML support:
I then created a Gradle task to write the information to an HTML file. Our Jenkins build executes this task, so that we always have an up-to-date list. I used Confluence’s html-include macro to include the HTML file in our Wiki.
Now our Wiki is always up-to-date.
Automatically Looking Up Missing Information
The next problem was to populate the XML file with additional information.
Had we had this file from the start, adding that information manually would not have been a big deal. In our case, we already had over a hundred dependencies, so automation was in order.
First I identified the components that miss the required information:
Next, I wanted to automatically look up the missing information and add it to the XML file (using Groovy’s MarkupBuilder). In case the required information can’t be found, the build should fail:
project.afterEvaluate {
  def missingComponents = missingExternalDependencies()
  if (!missingComponents.isEmpty()) {
    def manualComponents = []
    def writer = new StringWriter()
    def xml = new MarkupBuilder(writer)
    xml.expandEmptyElements = true
    println 'Looking up information on new dependencies:'
    xml.components {
      externalDependencyInfos().each { existingComponent ->
        component {
          id(existingComponent.id)
          friendlyName(existingComponent.friendlyName)
          latestVersion(existingComponent.latestVersion)
          license(existingComponent.license)
          licenseUrl(existingComponent.licenseUrl)
          approved(existingComponent.approved)
          comment(existingComponent.comment)
        }
      }
      missingComponents.each { missingComponent ->
        def lookedUpComponent = collectInfo(missingComponent)
        component {
          id(missingComponent)
          friendlyName(lookedUpComponent.friendlyName)
          latestVersion(lookedUpComponent.latestVersion)
          license(lookedUpComponent.license)
          licenseUrl(lookedUpComponent.licenseUrl)
          approved('?')
          comment(lookedUpComponent.comment)
        }
        if (!lookedUpComponent.friendlyName ||
            !lookedUpComponent.latestVersion ||
            !lookedUpComponent.license) {
          manualComponents.add lookedUpComponent.id
          println '    => Please enter information manually'
        }
      }
    }
    writer.close()
    def embeddedComponentsFile =
        project.file(embeddedComponentsInfo)
    embeddedComponentsFile.text = writer.toString()
    if (!manualComponents.isEmpty()) {
      throw new GradleException('Missing library information')
    }
  }
}
Anyone who adds a dependency in the future is now forced to add the required information.
So all that is left to implement is the collectInfo() method.
All of this took me a couple of days to build, but I feel that the investment is well worth it, since I no longer have to worry about the list of used libraries being out of date.
How do you maintain a list of used libraries? Please let me know in the comments.
There are many good reasons to use code written by others in your application.
This post describes some best practices to optimize your re-use experience.
Library Use Gone Bad
I recently discovered that a library we use for OpenID didn’t handle every situation properly. When I checked for an update, I found that the library is no longer maintained. So I found an alternative and tried to swap that new library in, only to discover that classes from the old library were used all over the place.
This little story shows that a lot can go wrong with using third-party libraries.
The remainder of this post will look at how to use libraries properly. I’m going to focus on open source projects, but most of the same considerations apply for commercial libraries.
1. Use Only Actively Maintained Libraries
Look at things like the date of the latest release, the number of developers contributing, and the sponsoring organizations.
2. Use Only Libraries With an Appropriate License
What’s appropriate for you obviously depends on your context. For instance, if you’re building and distributing a commercial, closed source application, you shouldn’t use any library that only comes with the GPL.
3. Limit the Amount of Code That Touches the Library
Use the Facade design pattern to wrap the library in your own interface. This has several advantages:
It allows you to easily replace the library with another, should the need arise
It documents what parts of the library you are actually using
It allows you to add functionality that the library should have provided but doesn’t, and do so in a logical place
4. Keep the Library Up-to-date
Many developers live by the rule “if it ain’t broke, don’t fix it”. However, you may not notice some of the things that are broken. For instance, many libraries contain security vulnerabilities that are fixed in later versions. You won’t notice these problems until a hacker breaches your application.
5. Write Regression Tests For the Library
If you’re regularly going to update the library, as I suggest, then you’d better know whether they broke anything in a new release. So you need to write some tests that prove the functionality that you want to use from the library.
As a bonus, these tests double as documentation on how to use the library.
6. Know What Libraries You Use
You should always be able to tell what libraries you are using at
any given moment, as well as their versions and licenses. You just never know when someone from the security team is going to call you about a critical vulnerability in a specific version of a library, or when the legal department suddenly decides to forbid the use of a certain license.
7. Take Ownership of the Library
Your application provides functionality to its users. They don’t care whether you build that functionality yourself, or whether you use a library. Not should they. When there is a problem anywhere in your code, you need to be able to fix it.
So think about how you are going to do that for the libraries you plan on using. Are the developing organizations responsive to bug reports? Do you have access to the source? Are the developing organizations willing to apply your patches? Does the license permit modifying the code for private use?
So what have your experiences been with using third-party libraries? Please let me know in the comments.
Refactorings are standard alterations of the code that change its internal structure without changing its external behavior.
Now, if the Green and Refactor phases are each others opposite, then you might think that there are “opposite refactorings” as well. You would be right.
Robert Martin‘s transformations are standard alterations of the code that change its external behavior without changing its internal structure.
Automated Transformations?
Most of us use powerful IDEs to write our code. These IDEs support refactorings, which means that they can do the code alteration for you in a manner that is guaranteed to be safe.
So do we need something similar for transformations? I think not.
Some transformations are so simple in terms of the changes to code, that it wouldn’t actually save any effort to automate them. I don’t see a lot of room for improving the change from if to while, for instance.
Other transformations simply have an unspecified effect. For example, how would you automate the statement->statements transformation?
The crux is that refactorings keep the external behavior the same, and the tools depend on that to properly implement the refactorings. However, transformations don’t share that property.
Standardized Work
In the Specify/Transform/Refactor view of TDD, we write our programs by alternating between adding tests, applying transformations, and applying refactorings.
In other words, if we look at the evolution of our non-test code through a series of diffs, then each diff shows either a transformation or a refactoring.
This time we’ll take a detailed look at the transformations applied in the Green phase.
The Transformation Priority Premise
Most of you will have heard of the refactorings we apply in the last TDD phase, but there are corresponding standardized code changes in the Green phase as well. Uncle Bob Martin named them transformations.
The Transformation Priority Premise (TPP) claims that these transformations have an inherent order, and that picking transformation that are higher on the list leads to better algorithms.
Anecdotal evidence is provided by the example of sorting, where violating the order leads to bubble sort, while the correct order leads to quicksort.
After some modifications based on posts by other people, Uncle Bob arrived at the following ordered list of transformations:
Transformation
Description
{}–>nil
no code at all->code that employs nil
nil->constant
constant->constant+
a simple constant to a more complex constant
constant->scalar
replacing a constant with a variable or an argument
statement->statements
adding more unconditional statements
unconditional->if
splitting the execution path
scalar->array
array->container
??? this one is never used nor explained
statement->tail-recursion
if->while
statement->recursion
expression->function
replacing an expression with a function or algorithm
variable->assignment
replacing the value of a variable
case
adding a case (or else) to an existing switch or if
Applying the TPP to the Roman Numerals Kata
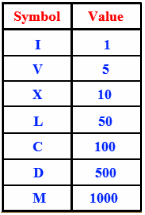
Reading about something gives only shallow knowledge, so let’s try out the TPP on a small, familiar problem: the Roman Numerals kata.
For those of you who are unfamiliar with it: the objective is to translate numbers into Roman. See the table at the left for an overview of the Roman symbols and their values.
As always in TDD, we start off with the simplest case:
public class RomanNumeralsTest {

  @Test
  public void arabicToRoman() {
    Assert.assertEquals("i", "i", RomanNumerals.arabicToRoman(1));
  }

}
We get this to compile with:
public class RomanNumerals {

  public static String arabicToRoman(int arabic) {
    return null;
  }

}
Note that we’ve already applied the first transformation on the list: {}->nil. We apply the second transformation, nil->constant, to get to green:
public class RomanNumerals {

  public static String arabicToRoman(int arabic) {
    return "i";
  }

}
Now we can add our second test:
public class RomanNumeralsTest {

  @Test
  public void arabicToRoman() {
    assertRoman("i", 1);
    assertRoman("ii", 2);
  }

  private void assertRoman(String roman, int arabic) {
    Assert.assertEquals(roman, roman,
        RomanNumerals.arabicToRoman(arabic));
  }

}
The only way to make this test pass, is to introduce some conditional (unconditional->if):
  public static String arabicToRoman(int arabic) {
    if (arabic == 2) {
      return "ii";
    }
    return "i";
  }
However, this leads to duplication between the number 2 and the number of is returned. So let’s try a different sequence of transformations. Warning: I’m going into baby steps mode now.
First, do constant->scalar:
public static String arabicToRoman(int arabic) {
  String result = "i";
  return result;
}
Next, statement->statements:
public static String arabicToRoman(int arabic) {
  StringBuilder result = new StringBuilder();
  result.append("i");
  return result.toString();
}
Now we can introduce the if without duplication:
public static String arabicToRoman(int arabic) {
  StringBuilder result = new StringBuilder();
  if (arabic >= 1) {
    result.append("i");
  }
  return result.toString();
}
And then another statement->statements:
public static String arabicToRoman(int arabic) {
  StringBuilder result = new StringBuilder();
  if (arabic >= 1) {
    result.append("i");
    arabic -= 1;
  }
  return result.toString();
}
And finally we do if->while:
public static String arabicToRoman(int arabic) {
  StringBuilder result = new StringBuilder();
  while (arabic >= 1) {
    result.append("i");
    arabic -= 1;
  }
  return result.toString();
}
Our test now passes. And so does the test for 3, by the way.
With our refactoring hat on, we spot some more subtle duplication: between the number 1 and the string i. They both express the same concept (the number 1), but are different versions of it: one Arabic and one Roman.
We should introduce a class to capture this concept:
public class RomanNumerals {

  public static String arabicToRoman(int arabic) {
    StringBuilder result = new StringBuilder();
    RomanNumeral numeral = new RomanNumeral("i", 1);
    while (arabic >= numeral.getValue()) {
      result.append(numeral.getSymbol());
      arabic -= numeral.getValue();
    }
    return result.toString();
  }

}

public class RomanNumeral {

  private final String symbol;
  private final int value;

  public RomanNumeral(String symbol, int value) {
    this.symbol = symbol;
    this.value = value;
  }

  public int getValue() {
    return value;
  }

  public String getSymbol() {
    return symbol;
  }

}
Now it turns out that we have a case of feature envy. We can make that more obvious by extracting out a method:
public static String arabicToRoman(int arabic) {
  StringBuilder result = new StringBuilder();
  RomanNumeral numeral = new RomanNumeral("i", 1);
  arabic = append(arabic, result, numeral);
  return result.toString();
}

private static int append(int arabic, StringBuilder builder,
    RomanNumeral numeral) {
  while (arabic >= numeral.getValue()) {
    builder.append(numeral.getSymbol());
    arabic -= numeral.getValue();
  }
 return arabic;
}
Now we can move the append() method to RomanNumeral:
public class RomanNumerals {

  public static String arabicToRoman(int arabic) {
    StringBuilder result = new StringBuilder();
    RomanNumeral numeral = new RomanNumeral("i", 1);
    arabic = numeral.append(arabic, result);
    return result.toString();
  }

}

public class RomanNumeral {

  private final String symbol;
  private final int value;

  public RomanNumeral(String symbol, int value) {
    this.symbol = symbol;
    this.value = value;
  }

  public int getValue() {
    return value;
  }

  public String getSymbol() {
    return symbol;
  }

  public int append(int arabic, StringBuilder builder) {
    while (arabic >= getValue()) {
      builder.append(getSymbol());
      arabic -= getValue();
    }
    return arabic;
  }

}
We can further clean up by inlining the getters that are now only used in the RomanNumeral class:
public class RomanNumeral {

  private final String symbol;
  private final int value;

  public RomanNumeral(String symbol, int value) {
    this.symbol = symbol;
    this.value = value;
  }

  public int append(int arabic, StringBuilder builder) {
    while (arabic >= value) {
      builder.append(symbol);
      arabic -= value;
    }
    return arabic;
  }

}
There is one other problem with this code: we pass in arabic and builder as two separate parameters, but they are not independent. The former represents the part of the arabic number not yet processed, while the latter represents the part that is processed. So we should introduce another class to capture the shared concept:
public class RomanNumerals {

  public static String arabicToRoman(int arabic) {
    ArabicToRomanConversion conversion
        = new ArabicToRomanConversion(arabic);
    RomanNumeral numeral = new RomanNumeral("i", 1);
    numeral.append(conversion);
    return conversion.getResult();
  }

}

public class RomanNumeral {

  private final String symbol;
  private final int value;

  public RomanNumeral(String symbol, int value) {
    this.symbol = symbol;
    this.value = value;
  }

  public void append(ArabicToRomanConversion conversion) {
    while (conversion.getRemainder() >= value) {
      conversion.append(symbol, value);
    }
  }

}

public class ArabicToRomanConversion {

  private int remainder;
  private final StringBuilder result;

  public ArabicToRomanConversion(int arabic) {
    this.remainder = arabic;
    this.result = new StringBuilder();
  }

  public String getResult() {
    return result.toString();
  }

  public int getRemainder() {
    return remainder;
  }

  public void append(String symbol, int value) {
    result.append(symbol);
    remainder -= value;
  }

}
Unfortunately, we now have a slight case feature envy in RomanNumeral. We use conversion twice and our own members three times, so it’s not too bad, but let’s think about this for a moment.
Does it make sense to let the roman numeral know about an conversion process from Arabic to Roman? I think not, so let’s move the code to the proper place:
public class RomanNumerals {

  public static String arabicToRoman(int arabic) {
    ArabicToRomanConversion conversion
        = new ArabicToRomanConversion(arabic);
    RomanNumeral numeral = new RomanNumeral("i", 1);
    conversion.process(numeral);
    return conversion.getResult();
  }

}

public class RomanNumeral {

  private final String symbol;
  private final int value;

  public RomanNumeral(String symbol, int value) {
    this.symbol = symbol;
    this.value = value;
  }

  public String getSymbol() {
    return symbol;
  }

  public int getValue() {
    return value;
  }

}

public class ArabicToRomanConversion {

  private int remainder;
  private final StringBuilder result;

  public ArabicToRomanConversion(int arabic) {
    this.remainder = arabic;
    this.result = new StringBuilder();
  }

  public String getResult() {
    return result.toString();
  }

  public void process(RomanNumeral numeral) {
    while (remainder >= numeral.getValue()) {
      append(numeral.getSymbol(), numeral.getValue());
    }
  }

  private void append(String symbol, int value) {
    result.append(symbol);
    remainder -= value;
  }

}
We had to re-introduce the getters for RomanNumeral‘s fields to get this to compile. We could have avoided that rework by introducing the ArabicToRomanConversion class first. Hmm, maybe refactorings have an inherent order too!
OK, on to our next test: 4. We can make that pass with another series of transformations. First, scalar->array:
public static String arabicToRoman(int arabic) {
  ArabicToRomanConversion conversion
      = new ArabicToRomanConversion(arabic);
  RomanNumeral[] numerals = new RomanNumeral[] {
    new RomanNumeral("i", 1)
  };
  conversion.process(numerals[0]);
  return conversion.getResult();
}
Next, constant->scalar:
public static String arabicToRoman(int arabic) {
  ArabicToRomanConversion conversion
      = new ArabicToRomanConversion(arabic);
  RomanNumeral[] numerals = new RomanNumeral[] {
    new RomanNumeral("i", 1)
  };
  int index = 0;
  conversion.process(numerals[index]);
  return conversion.getResult();
}
Now we need an if:
public static String arabicToRoman(int arabic) {
  ArabicToRomanConversion conversion
      = new ArabicToRomanConversion(arabic);
  RomanNumeral[] numerals = new RomanNumeral[] {
    new RomanNumeral("i", 1)
  };
  int index = 0;
  if (index < 1) {
    conversion.process(numerals[index]);
  }
  return conversion.getResult();
}
And another constant->scalar:
public static String arabicToRoman(int arabic) {
  ArabicToRomanConversion conversion
      = new ArabicToRomanConversion(arabic);
  RomanNumeral[] numerals = new RomanNumeral[] {
    new RomanNumeral("i", 1)
  };
  int index = 0;
  if (index < numerals.length) {
    conversion.process(numerals[index]);
  }
  return conversion.getResult();
}
You can probably see where this is going. Next is statement->statements:
public static String arabicToRoman(int arabic) {
  ArabicToRomanConversion conversion
      = new ArabicToRomanConversion(arabic);
  RomanNumeral[] numerals = new RomanNumeral[] {
    new RomanNumeral("i", 1)
  };
  int index = 0;
  if (index < numerals.length) {
    conversion.process(numerals[index]);
    index++;
  }
  return conversion.getResult();
}
Then if->while:
public static String arabicToRoman(int arabic) {
  ArabicToRomanConversion conversion
      = new ArabicToRomanConversion(arabic);
  RomanNumeral[] numerals = new RomanNumeral[] {
    new RomanNumeral("i", 1)
  };
  for (RomanNumeral numeral : numerals) {
    conversion.process(numeral);
  }
  return conversion.getResult();
}
And finally constant->constant+:
public static String arabicToRoman(int arabic) {
  ArabicToRomanConversion conversion
      = new ArabicToRomanConversion(arabic);
  RomanNumeral[] numerals = new RomanNumeral[] {
    new RomanNumeral("iv", 4),
    new RomanNumeral("i", 1)
  };
  for (RomanNumeral numeral : numerals) {
    conversion.process(numeral);
  }
  return conversion.getResult();
}
Now we have our algorithm complete and all we need to do is add to the numerals array. BTW, this should be a constant:
public class RomanNumerals {

  private static final RomanNumeral[] ROMAN_NUMERALS
      = new RomanNumeral[] {
    new RomanNumeral("iv", 4),
    new RomanNumeral("i", 1)
  };

  public static String arabicToRoman(int arabic) {
    ArabicToRomanConversion conversion
        = new ArabicToRomanConversion(arabic);
    for (RomanNumeral romanNumeral : ROMAN_NUMERALS) {
      conversion.process(romanNumeral);
    }
    return conversion.getResult();
  }

}
Also, it looks like we have another case of feature envy here that we could resolve as follows:
public class RomanNumerals {

  public static String arabicToRoman(int arabic) {
    return new ArabicToRomanConversion(arabic).getResult();
  }

}

public class ArabicToRomanConversion {

  private static final RomanNumeral[] ROMAN_NUMERALS
      = new RomanNumeral[] {
    new RomanNumeral("iv", 4),
    new RomanNumeral("i", 1)
  };

  private int remainder;
  private final StringBuilder result;

  public ArabicToRomanConversion(int arabic) {
    this.remainder = arabic;
    this.result = new StringBuilder();
  }

  public String getResult() {
    for (RomanNumeral romanNumeral : ROMAN_NUMERALS) {
      process(romanNumeral);
    }
    return result.toString();
  }

  private void process(RomanNumeral numeral) {
    while (remainder >= numeral.getValue()) {
      append(numeral.getSymbol(), numeral.getValue());
    }
  }

  private void append(String symbol, int value) {
    result.append(symbol);
    remainder -= value;
  }

}
Retrospective
The first thing I noticed, is that following the TPP led me to discover the basic algorithm a lot quicker than in some of my earlier attempts at this kata.
The next interesting thing is that there seems to be an interplay between transformations and refactorings.
You can either perform a transformation and then clean up with refactorings, or prevent the need to refactor by using only transformations that don’t introduce duplication. Doing the latter is more efficient and also seems to speed up discovery of the required algorithm.
Certainly food for thought. It seems like some more experimentation is in order.
Update: Here is a screencast of a slightly better version of the kata:
There seems to be some confusion between Test-First Programming and Test-Driven Development (TDD).
This post explains that merely writing the tests before the code doesn’t necessarily make it TDD.
Similarities Between Test-First Programming and Test-Driven Development
It’s not hard to see why people would confuse the two, since they have many things in common.
My classification of tests distinguishes six dimensions: who, what, when, where, why, and how.
Test-First programming and Test-Driven Development score the same in five of those six dimensions: they are both automated (how) functional (what) programmer (who) tests at the unit level (where) written before the code (when).
The only difference is in why they are written.
Differences Between Test-First Programming and Test-Driven Development
Test-First Programming mandates that tests be written before the code, so that the code will always be testable. This is more efficient than having to change already written code to make it testable.
Test-First Programming doesn’t say anything about other activities in the development cycle, like requirements analysis and design.
This is a big difference with Test-Driven Development (TDD), since in TDD, the tests drive the design. Let’s take a detailed look at the TDD process of Red/Green/Refactor, to find out exactly how that differs from Test-First Programming.
Red
In the first TDD phase we write a test. Since there is no code yet to make the test pass, this test will fail.
Unit testing frameworks like JUnit will show the result in red to indicate failure.
In both Test-First Programming and Test-Driven Development, we use this phase to record a requirement as a test.
TDD, however, goes a step further: we also explicitly design the client API. Test-First Programming is silent on how and when we should do that.
Green
In the next phase, we write code to make the test pass. Unit testing frameworks show passing tests in green.
In Test-Driven Development, we always write the simplest possible code that makes the test pass. This allows us to keep our options open and evolve the design.
We may evolve our code using simple transformations to increase the complexity of the code enough to satisfy the requirements that are expressed in the tests.
Test-First Programming is silent on what sort of code you write in this phase and how you do it, as long as the test will pass.
Refactor
In the final TDD phase, the code is refactored to improve the design of the implementation.
This phase is completely absent in Test-First Programming.
Summary of Differences
So we’ve uncovered two differences that distinguish Test-First Programming from Test-Driven Development:
Test-Driven Development uses the Red phase to design the client API. Test-First Programming is silent on when and how you arrive at a good client API.
Test-Driven Development splits the coding phase into two compared to Test-First Programming. In the first sub-phase (Green), the focus is on meeting the requirements. In the second sub-phase (Refactor), the focus is on creating a good design.
I think there is a lot of value in the second point. Many developers focus too much on getting the requirements implemented and forget to clean up their code. The result is an accumulation of technical debt that will slow development down over time.
TDD also splits the design activity into two. First we design the external face of the code, i.e. the API. Then we design the internal organization of the code.
This is a useful distinction as well, because the heuristics you would use to tell a good API from a bad one are different from those for good internal design.
Try Before You Buy
All in all I think Test-Driven Development provides sufficient value over Test-First Programming to give it a try.
All new things are hard, however, so be sure to practice TDD before you start applying it in the wild.
Many applications benefit from being open to extension. This post describes two ways to implement such extensibility in Java.
Extensible Applications
Extensible applications are applications whose functionality can be extended without having to recompile them and sometimes even without having to restart them. This may happen by simply adding a jar to the classpath, or by a more involved installation procedure.
One example of an extensible application is the Eclipse IDE. It allows extensions, called plug-ins, to be installed so that new functionality becomes available. For instance, you could install a Source Code Management (SCM) plug-in to work with your favorite SCM.
As another example, imagine an implementation of the XACML specification for authorization. The “X” in XACML stands for “eXtensible” and the specification defines a number of extension points, like attribute and category IDs, combining algorithms, functions, and Policy Information Points. A good XACML implementation will allow you to extend the product by providing a module that implements the extension point.
In this approach, an extension point is defined by an interface:
package com.company.application;

public interface MyService {
  // ...
}
You can find all extensions for such an extension point by using the ServiceLoader class:
public class Client {

  public void useService() {
    Iterator<MyService> services = ServiceLoader.load(
        MyService.class).iterator();
    while (services.hasNext()) {
      MyService service = services.next();
      // ... use service ...
  }

}
An extension for this extension point can be any class that implements that interface:
package com.company.application.impl;

public class MyServiceImpl implements MyService {
  // ...
}
The implementation class must be publicly available and have a public no-arg constructor. However, that’s not enough for the ServiceLoader class to find it.
You must also create a file named after the fully qualified name of the extension point interface in META-INF/services. In our example, that would be:
This file must be UTF-8 encoded, or ServiceLoader will not be able to read it. Each line of this file should contain the fully qualified name of one extension implementing the extension point, for instance:
com.company.application.impl.MyServiceImpl
OSGi Services
The SPI approach described above only works when the extension point files are on the classpath.
In an OSGi environment, this is not the case. Luckily, OSGi has its own solution to the extensibility problem: OSGi services.
@Service
@Component
public class MyServiceImpl implements MyService {
  // ...
}
With OSGi and SCR, it is also very easy to use a service:
@Component
public class Client {

  @Reference
  private MyService myService;

  protected void bindMyService(MyService bound) {
    myService = bound;
  }

  protected void unbindMyService(MyService bound) {
    if (myService == bound) {
      myService = null;
    }
  }

  public void useService() {
    // ... use myService ...
  }

}
Best of Both Worlds
So which of the two options should you chose? It depends on your situation, of course. When you’re in an OSGi environment, the choice should obviously be OSGi services. If you’re not in an OSGi environment, you can’t use those, so you’re left with SPI.
But what if you’re writing a framework or library and you don’t know whether your code will be used in an OSGi or classpath based environment?
You will want to serve as many uses of your library as possible, so the best would be to support both models. This can be done if you’re careful.
Note that adding a Declarative Services service component file like OSGI-INF/myServiceComponent.xml to your jar (which is what the SCR annotations end up doing when they are processed) will only work in an OSGi environment, but is harmless outside OSGi.
Likewise, the SPI service file will work in a traditional classpath environment, but is harmless in OSGi.
So the two approaches are actually mutually exclusive and in any given environment, only one of the two approaches will find anything. Therefore, you can write code that uses both approaches. It’s a bit of duplication, but it allows your code to work in both types of environments, so you can have your cake and eat it too.
 Consumption Economics, The New Rules of Tech, paints a detailed picture of the future of the technology business, combining vision with practical steps to realize it.
 Last week, I spend several days fixing a bug that only surfaced in a distributed environment.
 So how would a Frictionless Development Environment do version control for us?
 The basic point is that we can formally define a pipeline of processes that we want to run automatically.
 My ideal is to take this to the extreme with a
  The crux is for the tool to understand what you are doing, or else it could easily draw the wrong conclusion and create all kinds of artifacts that you don’t want.
 I once joined a project where running the “unit” tests took three and a half hours.
 There are many good reasons to use code written by others in your application.
 This post examines how well we really understand the practice of Test-Driven Development (TDD).
 Refactorings are standard alterations of the code that change its internal structure without changing its external behavior.
 The crux is that refactorings keep the external behavior the same, and the tools depend on that to properly implement the refactorings. However, transformations don’t share that property.
 Reading about something gives only shallow knowledge, so let’s try out the TPP on a small, familiar problem: the
  The first thing I noticed, is that following the TPP led me to discover the basic algorithm a lot quicker than in some of my earlier attempts at this kata.
 In the first TDD phase we write a test. Since there is no code yet to make the test pass, this test will fail.
 We may evolve our code using simple
  All in all I think Test-Driven Development provides sufficient value over Test-First Programming to give it a try.
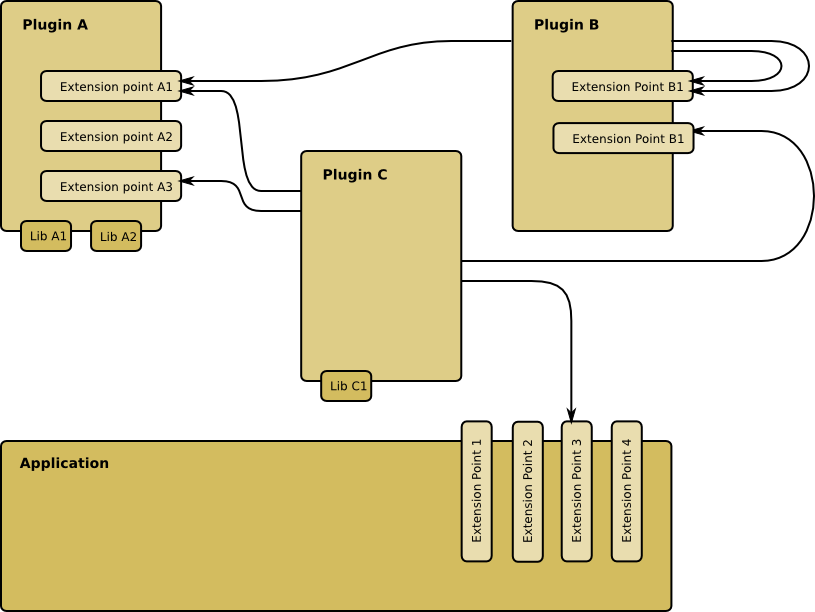
 But what if you’re writing a framework or library and you don’t know whether your code will be used in an OSGi or classpath based environment?
You must be logged in to post a comment.